
Hey guys, in this blog I am going to explain you about “Step by step New SQL server stand-alone installation”
Minimum requirement for SQL server 2019 installation
Hardware requirements:
Hard disk – It requires a Minimum 6GB of available hard-disk space.
Monitor – Super-VGA (800×600) or higher resolution monitor.
Memory – Minimum:
Express editions: 512 MB
All other editions: 1 GB
Recommended:
Express editions: 1 GB
All other editions: At least 4 GB and should be increased as database
size increases to ensure optical performance.
Processor Speed – Minimum: x64 Processor: 1.4 GHz
Recommended: 2.0 GHz 0r faster
Processor type – x 64 Processor: AMD Athlon 64, Intel Xeon with Intel EM64T support, Intel Pentium IV with EM64T support
Software Requirements:
Operating System: Windows 10 TH1 1507 or greater
Windows Server 2016 or greater
.NET Framework: Minimum operating systems includes minimum .NET framework.
STEP-1: Firstly, double click on a SQL server setup file(.exe) in your drive
Go to SQL server installation and select ‘New SQL server stand alone
installation or add features to an existing installation’

STEP-2: In License Terms you have to read all the steps and than accept the
license terms.
click on Next >

STEP-3: In feature selection, you have to select a feature for which you have to install.
Here we are using it for Database Engine services
Go to Feature selection and select Instance features ‘Database Engine Services’
Click on Next >

STEP-4: In Instance configuration you have to select either a Default instance or
Named instance.
In Named instance you can select your own name.
Here ,we are selecting default instance

STEP-5: Go to Server Configuration and put service account details like below,


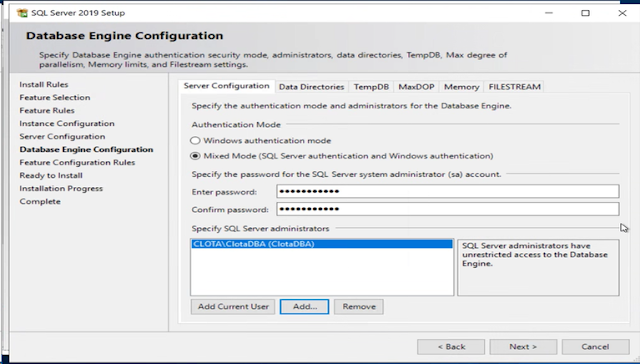
STEP -6: Go to Database Engine Configuration and select Server Configuration as
Mixed Mode and Enter the ‘password’ and add ‘SQL Server administrators’
Click on Next >
STEP-7: Go to Database Engine Configuration and select the ‘Data Directories’ and
give the path as given below,
Click on Next >

STEP-8: Go to Database Engine Configuration and select TempDB and Log Directory
as given below:
Click on Next >

STEP-9: Go to MaxDOP and check Maximum degree of parellelism(MaxDOP)
By default it is 2 ,so Click on Next >

Step -10: In Memory , go with the default configuration values as given below,
Click on Next >

Step-11: In FILESTREAM , go with the default configuration values as shown below,
Click on Next >

STEP-12: Installation is in progress ,wait for few minutes.

STEP-13: After Completing, click on close.

Just make sure you don’t get any error in summary .txt file.
Leave a Reply